Date ranges are a very common filter that database users want to implement in their queries. For example, let’s say your company sells office supplies and your databases tracks customer orders. You want to run a monthly query that summarizes total orders.
You can save your database users time and frustration by creating a friendly, interactive form that allows them to enter a beginning order date and an ending order date. Then, with a click of a button, they can run a query that displays the order information for their specified date range.
1. On the Create tab, click Form Design in the Forms group.
2. In the Form Design window, the Form Design Tools Group is now active.
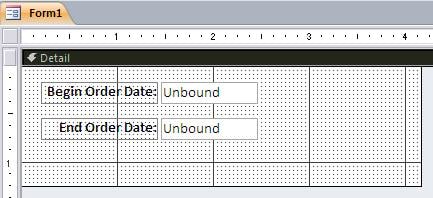
3. In the Controls group, click the Text Box to add a text box to the form.
4. Add a second text box to the form.
5. Change the caption in the label to be more descriptive (for example, Begin Order Date). Modify the second label (for example, End Order Date).
6. Click the “Unbound” portion of the first text box.
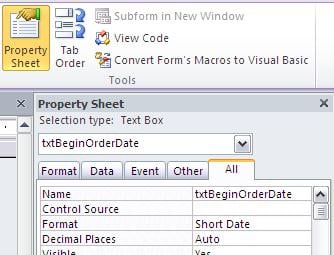
7. Make sure the Property Sheet pane is displayed on the right side of screen. Click Property Sheet, if the Property Sheet pane is not displayed.
8. On the Property Sheet, click the All tab.
9. Change the Name property to be descriptive (for example, txtBeginOrderDate).
10. Change the Format property to Short Date.
11. Click on the second “unbound” text box and change its Name and Format properties.
12. Save the parameter form. You can keep the parameter form open, since we’ll add a command button to it as our last step.
Modify the Query to Receive the Date Range Values from the Parameter Form
1. Open your query in Design View, or create the query, then switch to Design View.
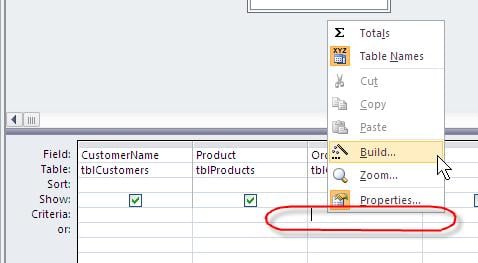
2. In the Criteria row of the appropriate date field, right-click and select Build…
3. The Expression Builder is now displayed. In the upper area, we’ll build an expression that selects the orders between a begin date and end date that’s entered in the parameter form.
4. Type the word between (followed by a space).
5. In the lower half of the Expression Builder, click on the (+) sign to the left of the Database name to expand the list.
6. Click on the (+) sign to the left of Forms.
7. If your interactive form is still open, you can expand the Loaded Forms list. If you closed the interactive form, expand All Forms. Click on the parameter form name.
8. In the middle area (under Expression Categories), you’ll see both text box names that you created on the interactive form
9. Double-click on the Begin Date text box. In the top-half of the Expression Builder, your expression may look something like:
between Forms![ParameterForm]![txtBeginOrderDate]
10. After the Begin Date text box name, type the word and, then double-click on the End Date text box name.
11. Your final formula will look something like this:
between Forms![ParameterForm]![txtBeginOrderDate] and Forms![ParameterForm]![txtEndOrderDate]
12. Click OK to save and close the Expression Builder.
13. The expression you just created will now display in the Criteria row of your query.
14. Save your query and close it.
Final Step: Create a Command Button to Run the Query
1. Open your parameter form and switch to Design View, if needed.
2. On the Form Design Tools group, click the Design tab.
3. Click Button.
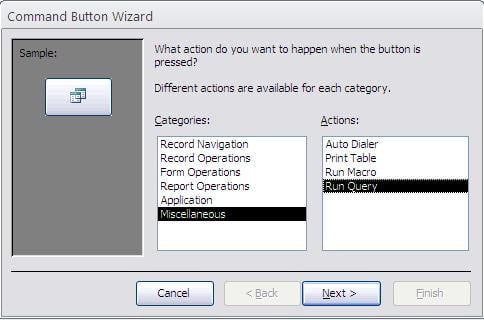
4. Click on the form to start the Command Button Wizard.
5. In the Categories list, click on Miscellaneous.
6. In the Actions list, click on Run Query.
7. Click Next.
8. Select your query and click Next.
9. Choose whether you want text or a picture for your button. Click Next.
10. Type a descriptive name (without spaces). For example, cmdRunOrdersDateQuery.
11. Click Finish.
12. Save your parameter form and test it out.
You might also like...
 |
 |
 |
| Did You Know That Excel Has a Built-In Training Log Template? | Advanced Microsoft Excel Training That Fits Your Busy Schedule | Creating a Drop-Down Parameter in Access 2010 |


